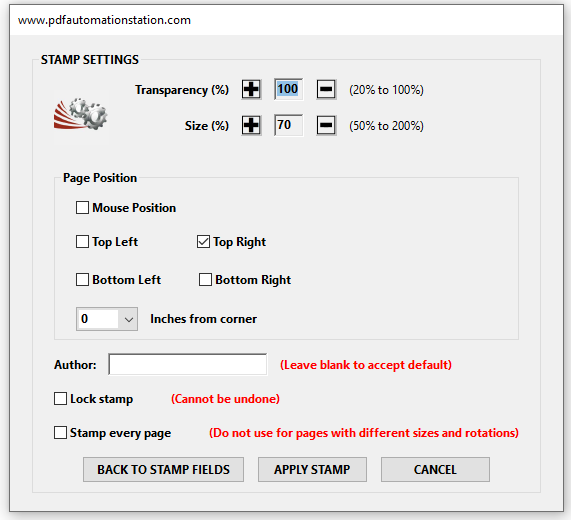
The image above is a popup dialog from our customizable 10-field dynamic stamp. It appears from the main popup dialog that appears when the stamp is applied by clicking a settings button that allows the stamp features in the dialog window to be changed on the fly (transparency, size, page position, author, locked, and stamp every page). The dialog window contains the following elements:
Dialog Elements Displayed In The Image
Name (www.pdfautomationstation.com) the title bar of the dialog window.
Clusters (the frames with the text STAMP SETTINGS and Page Position)
Static Text (all the text in red, plus the text Transparency, Size, Inches from corner, the % ranges for transparency and size, and Author)
Buttons (BACK TO STAMP FIELDS, APPLY STAMP, AND CANCEL)
Text Fields (for transparency and size displaying 100 and 70 respectively, and the text field to the right of Author:)
Popup (dropdown) field (to the left of Inches from corner text)
Check Box Fields (Mouse Position, Top Left, Top Right, Bottom Left, Bottom Right, Lock stamp, and Stamp every page)
Images (the PDF Automation Station image under STAMP SETTINGS and the plus and minus images for transparency and size).
View - these are containers that hold other elements. They are similar to clusters but have no text or visible frames so they are not visible in the image. My most frequent use for view elements is for aligning other elements horizontally. Without them, all elements not in a cluster or view would be aligned top to bottom. For example, there is an invisible view element that holds the three elements (static text, text field, static text) pictured below:
Dialog Elements Not Displayed In The Image
There are other elements that can be added to a popup dialog that are not included in the image at the beginning of this article.
Radio Buttons
Just like with radio buttons vs check boxes in PDF fillable forms, I prefer to use check boxes in dialogs as well, even when they are mutually exclusive (only one in the series can be checked) for the simple reason that you can’t uncheck all the radio buttons in a series. The five check boxes in the dialog image in the Stamp Position cluster are all mutually exclusive. For a series of mutually exclusive check boxes in a fillable form, simply name them identically with different export values. In a popup dialog, program a function into each one that clears the rest (slightly more complicated.
List Boxes
Hierarchical List Boxes
Progress Bars (undocumented)
Hyperlinks (URLs - also undocumented)
Gaps - These are invisible elements use for spacing
Ok Buttons - Closes the dialog and returns ok.
Ok/Cancel Buttons - Two buttons. If the Ok button is clicked, the dialog closes and returns ok. If the Cancel button is clicked, the dialog closes and returns cancel.
Ok/Cancel/Other buttons - These consist of three buttons: Ok, Cancel, and Other - which is regular button that doesn’t do anything until a function is programmed into it. We use it a lot for date picker dialogs that are triggered from the main dialog, especially in dynamic stamps.
app.execDialog Method
Popup dialog windows are created by the application method execDialog, which takes an object as the input parameter. Each element is another object inside the main dialog object. This is one of the reasons that programming dialogs is probably the most complex task in JavaScript for Acrobat. Another reason is that you have to constantly test the results to see how additions and changes appear. While most objects have sizing properties, you don’t necessarily know exactly how the dialog will appear until you test it. Size properties are optional. If omitted the dialog will usually size itself to fit the elements, but not always. I will work through an example. You can work through it with me by copying and pasting the scripts into the console, the running them in the console. It's crucial that you're familiar with the JavaScript console before proceeding.
Let's Build A Popup Dialog
In a Windows operating system you can close a window by pressing Alt + F4. I don't know what the Mac equivalent keystroke shortcut is, but if you're on a Mac, make sure you know before proceeding because there will be nothing to click to close the dialog window initially. And within the Acrobat/Reader environment, once a dialog window appears, you can't do anything else until it is closed. If you know the Mac keystroke shortcut, please drop it in the comments for the benefit of other readers. Before proceeding, close your PDF application down and restart it, then open the console and start running the scripts.
The first line of code contains the bare minimum of elements to produce a dialog. The size of the dialog will be small and there will be no buttons or X's to close it as previously mentioned (hence Alt + F4).
app.execDialog({description:{}})
The description object is empty. Once it is filled with elements they will appear from top to bottom in their order in the object. Now let's add an ok button.
app.execDialog({description:{elements:[{type:"ok"}]}})
Now you have an element with which to interact - an ok button. When it is clicked the dialog closes and returns ok. Notice that the elements in the description object are contained in an array. Let's change the button type to ok/cancel.
app.execDialog({description:{elements:[{type:"ok_cancel"}]}})
If OK is clicked, ok is returned. If Cancel is clicked, cancel is returned. Both buttons have a name property with defaults as displayed above. But the name property can be anything:
app.execDialog({description:{elements:[{type:"ok_cancel",ok_name:"DO IT",cancel_name:"DON'T DO IT"}]}})
Even though the button labels (name properties) are different, they still return ok or cancel. So far the entire object has been inside the execDialog method. The traditional way to build this is to build the object, define it as a variable, and pass the variable into the method like this,
var dlg={description:{elements:
[
{
type:"ok_cancel",
ok_name:"DO IT",
cancel_name:"DON'T DO IT"
}]}};
app.execDialog(dlg);
while adding line breaks to keep it organized. Now let's change the button type to ok/cancel/other.
var dlg={description:{elements:
[
{
type:"ok_cancel_other"
}
]}};
app.execDialog(dlg);
Notice the other button has no label. Since it is a regular button there is no default name. Also, clicking the button will not do anything because there is no function programmed into it yet. To add a label the name property must be added:
var dlg={description:{elements:
[
{
type:"ok_cancel_other",
other_name:"THIS IS THE LABEL FOR MY BUTTON"
}
]}};
app.execDialog(dlg);
Other Things Worth Noting
The button expands to fit the label.
The dialog window expands to fit the elements.
Both of these elements (description, buttons) have optional height and width properties measured in pixels.
var dlg={description:{
width:400,
height:400,
elements:
[
{
type:"ok_cancel_other",
height:200,
other_name:"THIS IS THE LABEL FOR MY BUTTON"
}
]}};
app.execDialog(dlg);
The focus has always been on the OK button. That's because no tab order has been set. Without a defined tab order the order top left to right then down left to right.
Add a static text element.
var dlg={description:{
elements:
[
{
type:"ok_cancel_other",
other_name:"OTHER",
other_width:25
},
{
type: "static_text",
name: "This is static static text"
}
]}};
app.execDialog(dlg);
Remember, the description elements go top to bottom. Move the static text element to the top:
var dlg={description:{
elements:
[
{
type: "static_text",
name: "This is static static text"
},
{
type:"ok_cancel_other",
other_name:"OTHER",
other_width:25
}
]}};
app.execDialog(dlg);
Dialog Research
To research more about dialogs search execDialog in the Acrobat JavaScript reference. I will continue next week with more tips and functionality for building popup dialog windows.