


Popups and Browse Windows Part I
The alert warning popup.


There are a lot of different popups and browse windows that can be created and activated in the PDF environment using JavaScript. The most complex is the popup dialog window, which can contain text fields, dropdowns, list boxes, check boxes, radio buttons, images, buttons, clusters, and functional hyperlinks, among other objects. Most of these are pictured in the image above, which is the global settings dialog for PDF Automation Station’s Exhibit Stamp, the most versatile Exhibit stamp on the market. This series of articles will describe how to program some of these popups and browse windows, starting with the simplest first.

The Alert Box
The application alert method pops up a warning message. All the input parameters can be labeled, inside curly brackets, like this:
app.alert({cMsg:"Hello World", nIcon: 1, nType:2, cTitle:"www.pdfautomationstation.com"});Or the labels and curly brackets can be ignored, like this:
app.alert("Hello World", 1, 2, "www.pdfautomationstation.com");The labels can be ignored for any Acrobat method as long as the parameters are listed in the correct order, no mandatory parameters are missing, and there are no missing parameters in that order before the last one used. cMsg is the only mandatory parameter in the app.alert method. You would not be able to write the script and ignore the labels if you only wanted the cMsg and nType parameters. The nIcon parameter would need to be included because it falls between the two and the order must be maintained. If using the labels, the order does not matter:
app.alert({nType:2, cMsg:"Hello World"});Since cMsg is the only mandatory parameter in the app.alert method, app.alert( ) will throw an error
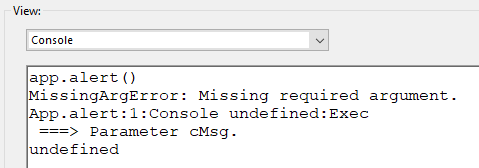
but app.alert("") will not (cMsg is present but it is an empty string).

Both examples from the code blocks above, when executed from the console, will display the following message:

If the same script is executed from a button field in a PDF, the message will look like this:

Notice the difference? Warning: JavaScript Window was added to the window frame. This warning freaks out a lot of people and I'm often asked to eliminate it. It can only be eliminated if the script is executed from a privileged context (console, action, or trusted function in a folder level script). A script inside a PDF form is not a privileged context, but a trusted function in a folder level script called from a PDF form is.
Input Parameters
cMsg - A string containing the message to be displayed (mandatory).
nIcon - An icon type (optional). Options:
0 - Error (default)
1 - Warning
2 - Question
3 - Status

nType - A button group type (optional). Options:
0 - OK (default)
1 - OK/Cancel
2 - Yes/No
3 - Yes/No/Cancel

Alert Button Group Options cTitle - The dialog box title (optional). If not specified Adobe Acrobat is used.
oDoc - The document object that the alert should be associated with. The default is this (this document).
oCheckbox - An optional check box, which itself is an object with three parameters.
cMsg - A text string to display next to the check box. If not specified the default is "Do not show this message again."
bInitialValue - Whether the initial state of the check box is checked. If set to true the box is not checked initially. If set to false or not specified, the box is not checked (the default).
bAfterValue - Contains the state of the check box when the alert window is closed. This value is the "answer" from the user (true or false) that can be used further.

Example
The following script, which can run in the console, will produce an alert with a check box.

var cb={cMsg:"Did you check the box?"};
app.alert({cMsg:"The results of your check box alert will appear.", nIcon:1,oCheckbox:cb})

if(cb.bAfterValue){app.alert("You checked the box.",1)}
else
{app.alert("You did not check the box.",1)}
Then one of these will appear depending on whether you checked the box in the previous popup:


The variable cb was passed into the oCheckbox parameter of the first popup and the result was used as a test to determine what happens next. if (cb.bAfterValue) is the equivalent of the script if (cb.bAfterValue==true). The Yes/No button can be used in place of the check box and it is much simpler (example to follow). All buttons return a numeric value when the alert is closed.
Button Return Values
The return values of the buttons are displayed in the following image.

The OK button (nType: 0) only has one option so the return value is always 1. In this case, if you wanted to run more code after the warning you would just run it, since the user only has one response (OK). Example:
app.alert("You are going to see another alert.",3);
app.alert("Here's the other alert.",1);
If you want to run more code depending on the user's response you would test the result of the alert like this:
// OK/Cancel
var rslt=app.alert("Which button did you click?",2,1)
if(rslt==1)
{app.alert('You clicked "OK".',3)}
else
{app.alert('You clicked "Cancel".',3)}
Or this:
// Yes/No
var rslt=app.alert("Which button did you click?",2,2)
if(rslt==4)
{app.alert('You clicked "Yes".',3)}
else
{app.alert('You clicked "No".',3)}
Or this:
// Yes/No/Cancel
var rslt=app.alert("Which button did you click?",2,3)
if(rslt==4)
{app.alert('You clicked "Yes".',3)}
else if(rslt==3)
{app.alert('You clicked "No".',3)}
else
{app.alert('You clicked "Cancel".',3)}
In the coming weeks I'll outline the scripting for more popups and browse windows.